Hexo搭建博客
准备工作
预备知识
- 有一个GitHub账号,没有的话去注册一个;
- 安装了node.js、npm,并了解相关基础知识;
- 安装了git for windows(或者其它git客户端)
本文所使用环境
- Windows8.1
- node.js@5.5.0
- git@1.9.2
- hexo@3.2.2
搭建GitHub博客
安装hexo
先创建一个文件夹blog,然后cd到这个文件夹下(或者在这个文件夹下直接右键git bash打开)。
1 | npm install -g hexo-cli |
接下来初始化一下hexo
1 | hexo init myblog |
这个myblog可以自己取什么名字都行,然后
1 | cd myblog //进入这个myblog文件夹 |
新建完成后,指定文件夹目录下有:
- node_modules: 依赖包
- public:存放生成的页面
- scaffolds:生成文章的一些模板
- source:用来存放你的文章
- themes:主题
- _config.yml: 博客的配置文件
打开hexo的服务:
1 | hexo g |
在浏览器输入localhost:4000就可以看到生成的博客了。
使用ctrl+c可以把服务关掉。
1 | hexo deploy |
将hexo部署到GitHub
新建仓库
新建一个名为你的用户名.github.io的仓库
将hexo和GitHub关联起来
也就是将hexo生成的文章部署到GitHub上,打开站点配置文件 _config.yml,翻到最后,修改为:
1 | deploy: |
这个时候需要先安装deploy-git ,也就是部署的命令,这样才能用命令部署到GitHub。
1 | npm install hexo-deployer-git --save |
hexo相关命令
1 | hexo clean |
其中:
- hexo clean清除了你之前生成的东西,也可以不加。
- hexo generate 顾名思义,生成静态文章,可以用 hexo g缩写
- hexo deploy 部署文章,可以用hexo d缩写
然后,可以在http://yourname.github.io 这个网站看到自己的博客了!!
有兴趣还可以自己购买域名哦!
使用buttfly主题
使用butterfly主题(稳定版)配置
clone主题
在博客根目录里:
1 | git clone -b master https://github.com/jerryc127/hexo-theme-butterfly.git themes/butterfly |
应用主题
修改站点配置文件_config.yml,把主题改为butterfly:
1 | theme: butterfly |
安装插件
载安装 pug 以及 stylus 的渲染器:
1 | npm install hexo-renderer-pug hexo-renderer-stylus --save |
配置
把主题文件夹中的 _config.yml 复製到 Hexo 根目录里,同时重新命名为 _config.butterfly.yml。
以后只需要在 _config.butterfly.yml进行配置就行。
Hexo会自动合併主题中的_config.yml和 _config.butterfly.yml里的配置,如果存在同名配置,会使用_config.butterfly.yml的配置,其优先度较高。
相关魔改
使用Hexo
常用hexo命令:
1 | hexo new "postName" #新建文章 |
部署文件需要三步
1 | hexo c |
markdown使用图片
安装图片插件hexo-asset-image
1 | npm install https://github.com/CodeFalling/hexo-asset-image --save |
由于hexo3版本后对很多插件支持有问题,hexo-asset-image插件在处理data.permalink链接时出现路径错误,因此
npm install hexo-asset-image --save使用会出现错误
修改配置文件
在_config.yml配置文件中,修改为
1 | post_asset_folder: true |
然后新建一篇文章
1 | hexo new post test |
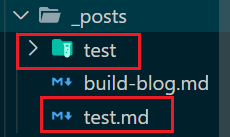
这个时候会出现一个 test.md 和 test 文件夹,在文件夹中加入相关照片
然后就可以在文章中引用了
1 | <!-- 方法一: --> |
重新编译一下,然后启动服务。
添加本地搜索功能
安装hexo-generator-searchdb插件
1 | npm install hexo-generator-searchdb --save |
修改站点配置文件_config.yml
1 | search: |
修改主题配置文件_config.butterfly.yml
1 | local_search: |
修改完上述的配置之后,就可以看到网站菜单上面多了一个搜索按钮,点击就可以进行搜索了。

